
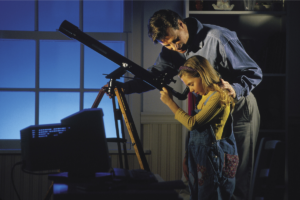
How To Use An iPhone With A Telescope To Take Pictures
Disclosure: This post contains affiliate links and I may earn a small commission (at no extra cost to you) if you click through and make a purchase. Thanks in advance – I really appreciate it!
My first smartphone was the iPhone 3S and one of my main objectives behind purchasing that phone was to use it to capture images of the Moon through my telescope. Although technology has changed and several models of iPhones have come and gone, the basic principle of taking pictures using an iPhone with your telescope still remains the same.
Key Takeaways:
How to use an iPhone with a telescope?
To use an iPhone with a telescope, fix the iPhone securely into a smartphone adapter and mount it on the eyepiece so that the iPhone’s camera is right above the eyepiece but not touching it. Launch iPhone’s camera app and point the telescope towards a distant object to take its picture.
In this article, I will explain in detail the best settings for your iPhone to be used with a telescope, how to fix your iPhone onto the telescope for astrophotography, how to take pictures of the moon and bright planets through your telescope using iPhone’s camera app, and much more.
How To Take Pictures Through A Telescope With An iPhone
It has become a typical sight at many stargazing gatherings. Amateur astronomers are frequently seen walking through the dark with their bright smartphones pointed skywards to check through their planetarium software – what’s visible tonight.
It’s quite obvious that if you have a phone camera and a telescope in hand, you will want to use both of them together and take nice pictures of the Moon or the brighter planets.
While the end results may not match those taken with webcam or DSLR equipment, smartphone astrophotography can be a good starting point if you’re a budding astrophotographer.
Moreover, using a smartphone with a telescope is an inexpensive way to try astrophotography. Here’s what you’ll need:
Accessories Required to Use an iPhone With a Telescope
Besides having an iPhone and a decent telescope with an eyepiece, you will also need:
- Smartphone adapter
- Eyepiece filters
- iPhone Astrophotography app
- Editing software
Smartphone Adapter
The simplest way to take a photo through the telescope is to simply hold your phone’s camera up to the eyepiece, but this approach rarely produces good results.
The telescope wobbles, and it is hard to keep the smartphone camera exactly above the small eyepiece lens.
Moreover, it is difficult to precisely center the object and it is difficult to ensure if the object is sufficiently exposed.
A simple adapter will dramatically improve your smartphone astrophotography.
A smartphone adapter is a great tool to help keep the iPhone steady while taking pictures and hold your phone securely to the telescope eyepiece.
Using your smartphone to take pictures of the planets and stars is a great way to start astrophotography without the need for expensive equipment.
The major telescope brands themselves offer smartphone adapters.
The Celestron NexYZ 3-Axis Smartphone Adapter connects your smartphone to your telescope and it works with a wide range of mobile phone models, including all the latest devices from Samsung, Google, and Apple.
Orion SteadyPix EZ Smartphone Telescope Photo Adapter is another great tool that can hold your iPhone steady and in the exact parallel position required for consistently sharp, precisely focused snapshots that are generally very difficult to achieve by hand.
Gosky Universal Cell Phone Adapter Mount is one of the best-selling and easy-to-use adapters that you can buy from Amazon. The adapter is compatible with telescopes, binoculars, microscopes, and other devices. It has a shield that blocks out unwanted light so that it can’t interfere with your image quality.
Eyepiece Filters
Good eyepiece filters can help to block out unwanted light and also increase the details of what your smartphone can capture.
They’re especially useful if your smartphone isn’t equipped with exposure control, bearing in mind that you need to be able to take pictures that dim the light so that the images aren’t overexposed.
It would help your iPhone astrophotography immensely if you have a variety of filters at your disposal as the magnification you’re using – and the magnitude of the object itself – will determine how bright or dim the object will appear to the camera.
I highly recommend using a filter if you intend to photograph a bright planet such as Jupiter. With a moon filter in place, you’ll be able to bring out the discernable features of the planet, whereas without a filter Jupiter will appear as a bright, over-exposed blob on our iPhone’s screen.
iPhone Astrophotography Apps
iPhone astrophotography apps will help you adjust your phone’s settings manually in order to elevate it so that it can match an astrophotography camera.
Some important settings you’ll have to tweak include increasing your phone’s ISO, which is – how much light hits its sensor.
For astrophotography in the dark, you certainly want the ISO to be as high as possible. An app like NightCap Camera will be helpful here. This app was specially designed to take pictures in a low-light environment using an iPhone.
Editing Software
To capture the most detail out of the planet or the Moon, I recommend recording a short video clip of the object using the iPhone’s camera. You can then use freely available image stacking software to select and stack the best individual frames from the video.
A stacking software uses multiple photos so that the best result can be derived from them.
Once you have shot the video of a planet or the Moon, you can then directly import iPhone video into a shareware program called Keith’s Image Stacker to accomplish stacking.
How To Attach Your iPhone To A Telescope
It’s quite easy to fix your iPhone to a smartphone adapter and start using it with your telescope.
Please note that the installation instructions will vary from one adapter to the next, but in most models, you’ll have to follow these steps to install your smartphone telescope adapter.
Use a knob on the adapter to open its bracket so that you can place your iPhone in it.
Most adapters will allow you enough space so that you don’t have to remove your phone’s case.
Ensure that your phone is securely fastened, then check that its camera isn’t restricted or blocked. Some adapters will make use of an eyepiece mounting ring for the phone.
With some phone adapter models, the adapter with your phone in it will be attached to the eyepiece which you’ll then insert into the telescope. You will probably have knobs or screws to tighten to ensure that the eyepiece attaches to the adapter.
With other types of smartphone telescope adapters, you may have to mount the adapter to the telescope’s eyepiece before you can slide your iPhone in it.
Most smartphone adapters come with an instruction manual. Go ahead and read it thoroughly before you attempt to use it with your iPhone and the telescope.
Take Pictures of the Moon Through a Telescope Using an iPhone
With its shifting phase and the wobbles of libration bringing myriad new features into view each night, the Moon is a wonderful target for photographers of all abilities.
Whatever type of telescope you use, make sure it’s well collimated, by ensuring that its optics are carefully aligned to produce the sharpest image possible. Your telescope’s instruction manual will show you how to do this.
Use astronomy apps or software to decide what date and time to photograph
Pick a date when your Moon target is near the line between the illuminated and dark portions: the terminator.
Shoot when the target is lit from an angle to reveal surface textures and rugged lunar crust, craters, and other subtle features like rilles.
Check the seeing conditions: atmospheric turbulence that can blur and distort your view of the Moon.
Take a short video of just over a minute. A video taken with an iPhone has many frames each second. It enables the sharpest moments of clarity to be selected.
You can then stack these frames together using stacking software (mentioned previously in the article) and process them further to bring out tremendous detail on the Moon’s surface.
You can download free apps to photograph the Moon from the Apple play store. Apps such as ‘Moon Globe’, ‘Stellarium’, ‘Virtual Moon Atlas’ are all great options that show what the Moon looks like for a given date and time, complete with shadow details.
Take Pictures of the Planets Through a Telescope Using an iPhone
Astroimaging a planet properly with an iPhone takes a bit more effort than shooting a video of the moon. The moon is large, and you don’t need to use high magnification to film it. Whereas, to photograph the planets, you need high magnification, so you have to use a Barlow lens or short focal length eyepiece. In this case, you need a motorized mount that will automatically track the planet throughout Earth’s rotation.
You do not really need an advanced telescope or a DSLR to find and photograph the five visible planets (Mercury, Venus, Mars, Jupiter, and Saturn). A simple beginner’s telescope and your iPhone will do just fine.
Because the major bodies in the solar system orbit the Sun in nearly the same plane of the ecliptic, the position of each planet is predictable and you can plan for photographic opportunities in the future.
To photograph a planet through a telescope using an iPhone, you’ll have to use the eyepiece projection method with a telescope. The eyepiece projection method is when you place the camera lens of your phone perpendicular to the center of the telescope eyepiece to capture the action.
You should also use your iPhone’s built-in zoom to make the planet bigger on the screen. Without that, you only have the option of using the magnification provided by the eyepiece.
Use the manual controls of your iPhone camera to adjust settings such as exposure time, ISO, and aperture (if available). Once you find the right settings to properly expose the planet you are photographing (so the planet is not too bright), just take a picture or better yet, shoot a short video to be processed later in stacking software.
The best video frames (the least blurry images) are then extracted and stacked, to reveal surface details and vivid colors.
Conclusion
Taking pictures through a telescope using your iPhone doesn’t require the most expensive equipment or professional astrophotography skills. But, you’ll have to master your telescope and practice a bit before getting really great results. Your first images might not blow you away but don’t worry. Take some time experimenting with different eyepieces, filters, and software, etc. Your success will also depend on clear skies and steady nights.
Written by:

Kavya Joshi
My love affair with space began in a field in India at the age of 7, when I looked up at the Milky Way for the first time. Ever since, I have been attempting to cram in every fact about the Universe, I can find into my head.


ABOUT US
We are a team of active amateur astronomers, here to help you with all your astronomy and science related needs – this is anything, from reviewing the latest telescopes to be released to talking about gravity and neurons. The Big Bang Optics was started because of our love for astronomy and to help others like us find the best telescope and accessories.
LEGAL DISCLAIMER
The Big Bang Optics is a participant in the Amazon Services LLC Associates Program, an affiliate advertising program designed to provide a means for sites to earn advertising fees by advertising and linking to Amazon.com. The Big Bang Optics also participates in affiliate programs with Clickbank and other sites. The Big Bang Optics is compensated for referring traffic and business to these companies.